ENV* K105
Assignment #3
Due 9/20/05
Carry out the exercise below. Save your files on a USB drive, floppy, Zip disc or in a folder on your I:\ drive named "HW3." Then submit them using the dropbox in WebCT.
In this assignment you will create a form template for a letter report that you generate over and over from written data. You may want to refer to Microsoft Word Help files or Special Edition Using Microsoft Office 2003, by Bott and Leonhard, chapters 21 and 22 for more information.
- Read this assignment and print it if necessary.
Form Template Assignment:
- Download the document you will modify. This is a letter typed in Word 2003. You will edit the letter, put in form fields and save it as a template.
- Download the document Assmt3Form.doc. (Click here for information on saving a Word document from the Web.)
- Open the document in Word
- Save the letter as a document template.
- Choose File, Save As....
- Change the Save As Type to Document Template (*.dot). Note: Usually you would save templates in C:\Documents and Settings\Default User\Application Data\Microsoft\Templates, but that folder may not be accessible to you on the lab machines. Check with me on this in class.
- Change the file name to "NastyLetter.dot", and choose "Save". As you work, periodically resave your work by choosing File, Save; hitting CTRL-S; or clicking the save button on the toolbar.
- You may need to set your template location to your I:\ drive (or wherever you saved the template) to use the template. (Check with Benoit on this.)
- On the menu bar, choose Tools, Options.... Select the File Locations tab.
- The User templates line gives the current setting. Select it and hit Modify to change.
- Click the down arrow next to the Look in box and select your I:\ drive or other location. Click OK twice.
- Now you will replace some of the information with form fields. These are spaces in a template that you can fill in each time you create a new document based on the template. When the form is locked, only the fields can be edited. This can be convenient and time saving, you'll see. The fields that you will replace are: the date, the name, street, town, state, zip, the greeting, the collection date, the fertilizer count, the interpretation, and the closing.
- Right click in the toolbar area or choose View, Toolbars, and check the Forms toolbar.
- The three left-most buttons are three field types: Text,
 , Check Box,
  , and Drop-Down,
  .
. - Highlight the date. Click the Text Form Field button on the form toolbar, . The date will be replaced by a little gray box. (If the box is not gray, be sure that the Form Field Shading button, with the little "a" on it, is pressed on the Forms toolbar.)
- Click the Form Field Options button on the Forms toolbar (with the little pointing finger:
 ). The Text Form Field Options dialogue box will open.
 - Set the Type to Date, the Default date to 9/20/05 and the Date format to d-MMM-yy (using the drop down list). Change the Bookmark from Text1 to RepDate. Be sure that Fill-in enabled is checked.
- Next replace "Joe Jones" with a Text Form Field with the Type set to Regular text, the Default text set to "name" and the Text format set to Title case. Name the field RepName (put that in the Bookmark box.
- Do the same for "1 Greentree Drive". Set the Default text to "address". Name the field "Street".
- Do the same for "Norwich". Set the Default to "Town" and name the field "Town".
- Replace "CT" with a Text Form Field formatted to Uppercase. Set the default to "ct" and name the field "State".
- Replace "06360" with a Text Form Field named "Zip". Set the default to "00000-0000".
- Replace "Mr Jones" with something that will make sense if Jones isn't the addressee of the letter. You might try "Dear Polluter". (Or you could use a REF field. See below.)
- Replace the collection date ("13-Sep-05") with a Date field formatted as above and named "ColDate".
- Replace the weather conditions and fertilizer test result with Drop-Down Fields.
- Highlight "a heavy rain" and hit CTRL-C to copy it. Then click the Drop-Down Form Field button.
- Double click the gray box that appears to open the Drop-Down Form Field Options dialogue box.
- Hit CTRL-V to paste "a heavy rain" into the Drop-down item box. Click the Add button. Then type in "a light rain" and click add. Finally, add "dry weather" to the list. Change the Bookmark to "Weather".
- Replace "Very High" with a Drop-Down Form Field with the "Very High", "High", "Average", "Low" and "Very Low" as the list of items. Move "Average" to the top of the list by highlighting it and clicking the up Move arrow. Name this field "Result1".
- Now you will make some modifications to the paragraph that reads, "A level of Very High indicates that you are busy suffocating lobsters in Long Island Sound. Keep up the good work!"
- Place the cursor after the word "indicates" and type a colon (":") and hit Enter to start a new paragraph. Highlight the words "Very High" and hit delete. With the cursor in the same location, hit CTRL F9. Squiggly brackets highlighted in gray will appear. Inside the brackets type "Result1" (without the quotation marks). This is a REF field that will automatically display the value of the Results1 dropdown field.
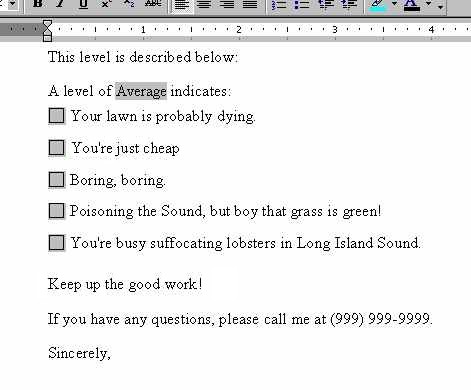
- Make a series of five paragraphs, each of which starts with a Check Box Form Field. (You will be able to check one to specify the which one applies.)
- The paragraphs correspond to the five results levels (ie, very low, low, average, high, and very high).
- Use the following texts:
- Include the statement "Keep up the good work!" at the end of the letter.
- Replace the closing with one that is appropriate to you.
- Add the filename and path to the footer.
- Choose View, Header and Footer.
- Click the Switch Between Header and Footer button:

- From the Insert Auto Text drop down list, select Filename and path.
- Close the Footer.
- Lock the fields (press the Protect Form button, with the little lock on it, on the Forms toolbar). Close the Forms toolbar. Save and close your template.
- To use the template, create a new document based on it.
- Choose File, New.... The New Document task pane appears.
- The fourth category down is New from template. Click General Templates.
- Under the General tab you should see NastyLetter.dot if you have saved it to the file location that Word is looking in. (See 2.d. above.)
- You can scroll through the fields modifying the default values. Notice that you start at the first field, and Tab jumps you to the next. If the template was saved with the fields locked, you can only type in the form fields.
- Create a new letter and save it as "xxxxNL1.doc" where "xxxx" is your name. Print both the template and the document. Turn in the printed pages in class and the doc and dot files via WebCT.
- OPTIONAL: See Assignment 3A if you want to build a macro to automatically update Result2.
|
Very Low |
Your lawn is probably dying. |
|
Low |
You're just cheap. |
|
Average |
Boring, boring. |
|
High |
Poisoning the Sound, but boy that grass is green! |
|
Very High |
You're busy suffocating lobsters in Long Island Sound. |
Note: Don't type the "Very High" etc in here. Make it look like this: